Published
- 4 min read
How to optimize a Go deployment with Docker

How to optimize a Go deployment with Docker ?
In this article, I will present the different steps that led me to optimize the deployment of services in golang using docker.
A simple Dockerfile
When I started Go and deployed a rest api service for my Memnix application, I used a very simple Dockerfile that I had found on the internet.
CHECKFROM golang:1.19
RUN mkdir -p /go/src/myapp
WORKDIR /go/src/myapp
COPY . /go/src/myapp
RUN go get -d -v
RUN go install -v
EXPOSE 8080
CMD ["/go/bin/myapp"]
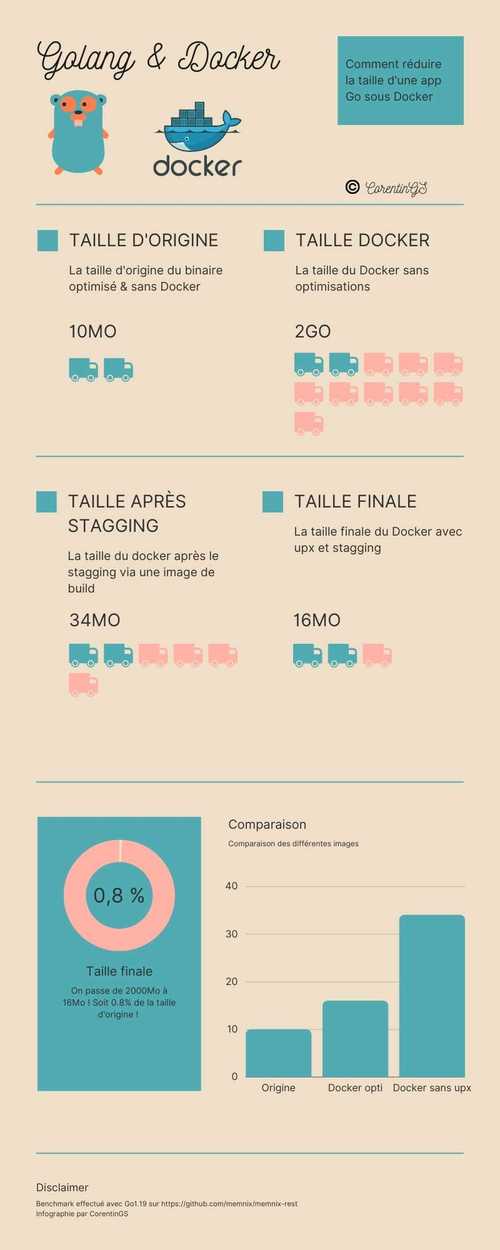
The problem is that I ended up with a 2GB image while my project compiled locally without docker and optimized was only 10MB! So I decided to try to optimize the size of my Docker image as much as possible.
The first step: using a multi-stage build
It is possible to separate our Dockerfile in several parts and to use several images:
-
One image to build the project
-
A minimalist image to deploy it
This method allows us not to keep the sources and all the development tools provided with the golang image. Thus, we only keep the binaries. I decided to use the golang:1.19-alpine image as the builder.
CHECKFROM golang:1.19-alpine as builder
LABEL stage=gobuilder
ENV CGO_ENABLED=0
ENV GOOS linux
WORKDIR /build
COPY go.mod go.sum .
RUN go mod download
COPY . .
RUN go get -d -v
RUN go build -o /app/myapp .
This first part of the Dockerfile allows us to copy the sources, to synchronize the packages and to launch the command go build to generate the binary. Once the build is finished, we use a minimalist alpine image that will be used for deployment. We just need to copy the binary from our builder and run it.
CHECKFROM alpine:latest
WORKDIR /app
COPY --from=builder /app/myapp .
EXPOSE 8080
CMD ["/app/myapp"]
After testing this new Dockerfile, the final image was 34MB. It’s far from the original 10MB but it’s still much better than 2GB.
Improve the build process
It is possible in Golang to add flags to the build command in order to slightly optimize the binary size. After a little research on internet, I discovered the existence of “-s -w” flags. After testing them locally, I noticed an improvement of a few MB so I decided to add them to my Dockerfile. I also discovered Upx which is a small program that allows to compress binary files to reduce their size. I tested this little software in a terminal and I noticed an improvement of almost 50% on the size of the Memnix api. So I also added this step to my Dockerfile.
CHECKFROM golang:1.19-alpine as builder
LABEL stage=gobuilder
ENV CGO_ENABLED=0
ENV GOOS linux
RUN apk update --no-cache && apk add upx
WORKDIR /build
COPY go.mod go.sum .
RUN go mod download
COPY . .
RUN go get -d -v
RUN go build -ldflags="-s -w" -o /app/myapp .
RUN upx /app/myapp
FROM alpine:3.14
WORKDIR /app
COPY --from=builder /app/myapp .
EXPOSE 8080
CMD ["/app/myapp"]
And here is my new Dockerfile! It may seem much longer and more complex than the first version but in the end, the result is very interesting. After testing this new Dockerfile, the final image is 16Mb so only 6Mb more than the version without Docker which is almost negligible.
Conclusion
Docker is a great tool to simplify application development and deployment, but it can be problematic if used incorrectly. This experience helped me understand how to better use Docker and how to optimize my images. This article is inspired by a twitter thread and the complete code of my Dockerfile is available on my github. I hope this first article will interest you, don’t hesitate to give me feedback so I can improve for the next articles and share your tips on Docker or Golang!
Here is a small infographic that summarizes the evolution of our Docker image. It’s in French but I think you can understand it anyway.
